Chimping is not necessarily a bad thing and unless there is a possibility of missing a shot, reviewing your images after you take them is a good practice to double check the exposure, focus and composition.
To use exposure compensation, just take the shot and then evaluate the image using the histogram. It is important to use the histogram for this and not just the picture as it appears on the back of your camera. The LCD is not all that accurate when it comes to exposure. Remember that if you shoot in RAW, what you are seeing on the back of your camera is a compressed version of the image and not an accurate representation of the RAW file. Also, your LCD’s brightness can be adjusted, so if you turn the brightness down when you are photographing at night all your images will appear darker during the day.
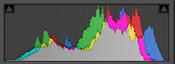
Using the histogram is easy. The blacks are on the left, the whites are on the right, all the mid-tones are in between. All you really need to know is that a spike on either edge of the graph is bad.
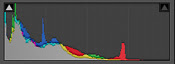
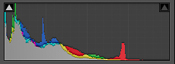
Under exposed image.
Good exposure.
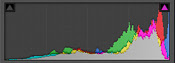
Over exposed image.
If there is a spike on the left edge, it means part of your image is completely black. You may want to use your exposure compensation to adjust the exposure to the right to make it brighter. But remember that having part of your image completely black, especially for a night shot, is okay.
If there is a spike on the right edge, it means part of your image is completely white and contains no data. Never let any substantial part of your image go completely white. Because it contains no data at all, it will always remain a white spot no matter what you try to do in post-processing. It’s better to keep the graph off the right edge. You only need to worry about this if the spike is right on the very edge of the histogram – if it spikes before the edge it is not a problem.
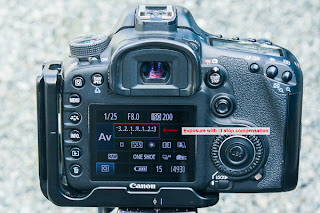
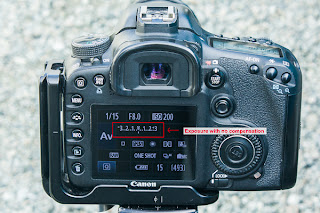
Once you evaluate your image using the histogram, you can use your exposure compensation to make the image darker or lighter without having to worry about changing the aperture, shutter speed, or ISO. If you just want it a little darker, turn the exposure compensation down a little. Or turn it up a little if your image is too dark. You’ll have to check your camera manual again to see how to do this. On my camera, I hold the shutter half way down and move the wheel on the back of my camera to change the exposure compensation.
This is the quickest method to use when you have time to chimp. While bracketing will ensure one of the three exposures is useable, this method is more precise and deliberate.